rxvt-unicode の設定 (と、わりと微妙な自作カラースキームの紹介)
設定ファイル
#define FGCOLOR      #f7fcfe
#define BGCOLOR      #203744
#define BLACK        #0d0015
#define B_BLACK      #2b2b2b
#define RED          #a25768
#define B_RED        #ee827c
#define GREEN        #82ae46
#define B_GREEN      #93ca76
#define YELLOW       #f08300
#define B_YELLOW     #f7c114
#define BLUE         #455765
#define B_BLUE       #53727d
#define MAGENTA      #68699b
#define B_MAGENTA    #a59aca
#define CYAN         #008899
#define B_CYAN       #59b9c6
#define WHITE        #9fa0a0
#define B_WHITE      FGCOLOR

URxvt.termName: rxvt
URxvt.font: xft:Ricty:size=10:antialias=true
URxvt.letterSpace: 0
URxvt.transparent: true
URxvt.shading: 100
URxvt.saveLines: 2048
URxvt.scrollBar_right: true
URxvt.scrollstyle: plain
URxvt.fading: 40
URxvt.foreground: FGCOLOR
URxvt.background: BGCOLOR
URxvt.cursorColor: FGCOLOR
URxvt.cursorColor2: BGCOLOR
URxvt.highlightColor: FGCOLOR
URxvt.highlightTextColor: BGCOLOR

! 基本 8 色
URxvt.color0:  BLACK
URxvt.color1:  RED
URxvt.color2:  GREEN
URxvt.color3:  YELLOW
URxvt.color4:  BLUE
URxvt.color5:  MAGENTA
URxvt.color6:  CYAN
URxvt.color7:  WHITE
! 基本 8 色の Bright 色
URxvt.color8:  B_BLACK
URxvt.color9:  B_RED
URxvt.color10: B_GREEN
URxvt.color11: B_YELLOW
URxvt.color12: B_BLUE
URxvt.color13: B_MAGENTA
URxvt.color14: B_CYAN
URxvt.color15: B_WHITE
% xrdb -merge ~/.Xresources
このとき C 言語のプリプロセッサを通るらしいので、#define による定数の定義や #ifdef による条件分岐などを書くことができます。
ここでは color0 ~ color15 の説明はあと回しにして、先に 20 ~ 34 行目を説明します。詳細は urxvt(1) と urxvt(7) のマニュアルを参照してください。
termNameここで設定した値が環境変数 TERM にセットされます。その意味についてはよくわかりませんが、これをセットしないといろいろ挙動がおかしいです。
font使用するフォントを指定します。
letterSpace文字と文字の間隔をピクセル単位で指定します。デフォルト値は 0 で、負の値を指定すれば間隔が詰まり、正の値を指定すれば開きます。
transparenttrue のとき背景が疑似透過されます。疑似透過では、デスクトップの背景は透過しているように見えますが、ウィンドウの重なりなどは表現できません。そこまでするには完全透過の設定が必要ですが、ここでは触れません。
shading疑似透過の透過率と思われます。0 に近づくほど透けなくなります。
saveLinesスクロールバックしたときにたどれる行数。
True のときスクロールバーを右に表示します。scrollBar_rightscrollstyleスクロールバーのスタイル。plain にすると最近流行りのフラットな感じになります。
fadingurxvt のウィンドウがフォーカスから外れたときにグレーアウトしたように見せます。単位は % で、100 に近づくほど暗くなります。
foreground文字色を RGB で指定します。
background背景色を RGB で指定します。
cursorColorカーソル色を RGB で指定します。
cursorColor2カーソル上にある文字の色を RGB で指定します。デフォルトで background に指定した色が使われます。
highlightColor強調表示された文字 (マウスで選択された範囲など) の背景色を RGB で指定します。
highlightTextColor強調表示された文字の文字色を RGB で指定します。
カラースキームの検討
| リソース名 | インデックス | 色名 | ANSI (文字色) | ANSI (背景色) | 備考 |
|---|---|---|---|---|---|
| foreground | ― | ― | 39m | ― | ― |
| background | ― | ― | ― | 49m | ― |
| color0 | 0 | Black | 30m | 40m | ― |
| color1 | 1 | Red | 31m | 41m | ― |
| color2 | 2 | Green | 32m | 42m | ― |
| color3 | 3 | Yellow | 33m | 43m | ― |
| color4 | 4 | Blue | 34m | 44m | ― |
| color5 | 5 | Magenta | 35m | 45m | ― |
| color6 | 6 | Cyan | 36m | 46m | ― |
| color7 | 7 | White | 37m | 47m | ― |
| color8 | 8 | Bright Black | 1;30m / 90m | 1;40m / 100m | (*) |
| color9 | 9 | Bright Red | 1;31m / 91m | 1;41m / 101m | (*) |
| color10 | 10 | Bright Green | 1;32m / 92m | 1;42m / 102m | (*) |
| color11 | 11 | Bright Yellow | 1;33m / 93m | 1;43m / 103m | (*) |
| color12 | 12 | Bright Blue | 1;34m / 94m | 1;44m / 104m | (*) |
| color13 | 13 | Bright Magenta | 1;35m / 95m | 1;45m / 105m | (*) |
| color14 | 14 | Bright Cyan | 1;36m / 96m | 1;46m / 106m | (*) |
| color15 | 15 | Bright White | 1;37m / 97m | 1;47m / 107m | (*) |
| (*) | 私の試したかぎり、Bright な色を ANSI で「1;30m」のように指定しても、urxvt では「30m」と同じ色になってしまいました。Bright 色を指定したければ、文字色なら 90m ~、背景色なら 100m ~ の系列で指定する必要がありそうです。 |
カラースキームを (半) 自作してみた
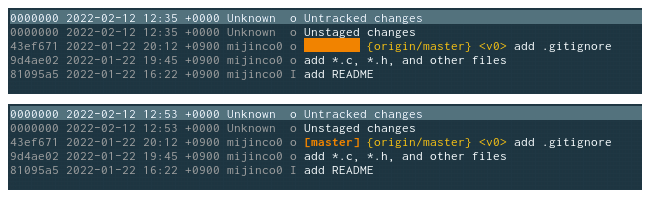
Tig で気になった点を調整してみた
#color main-head color11 default        # なぜか背景色が変わる
color  main-head color3  default bold   # 色は期待どおりだがフォントウェイトが…
#define DISORDER
...
#ifdef DISORDER
! 1 軍色
URxvt.color0:  YELLOW
URxvt.color1:  B_RED
URxvt.color2:  GREEN
URxvt.color3:  B_YELLOW
URxvt.color4:  B_BLUE
URxvt.color5:  B_MAGENTA
URxvt.color6:  BLUE
URxvt.color7:  WHITE
! 2 軍色
URxvt.color8:  B_BLACK
URxvt.color9:  RED
URxvt.color10: B_GREEN
URxvt.color11: BLACK
URxvt.color12: CYAN
URxvt.color13: MAGENTA
URxvt.color14: B_CYAN
URxvt.color15: B_WHITE
#else
! 基本 8 色
URxvt.color0:  BLACK
URxvt.color1:  RED
URxvt.color2:  GREEN
URxvt.color3:  YELLOW
URxvt.color4:  BLUE
URxvt.color5:  MAGENTA
URxvt.color6:  CYAN
URxvt.color7:  WHITE
! 基本 8 色の Bright 色
URxvt.color8:  B_BLACK
URxvt.color9:  B_RED
URxvt.color10: B_GREEN
URxvt.color11: B_YELLOW
URxvt.color12: B_BLUE
URxvt.color13: B_MAGENTA
URxvt.color14: B_CYAN
URxvt.color15: B_WHITE
#endif

おまけ: カラースキームの検討に使った・使い損ねた自作ツール
コントラスト比表示ツール
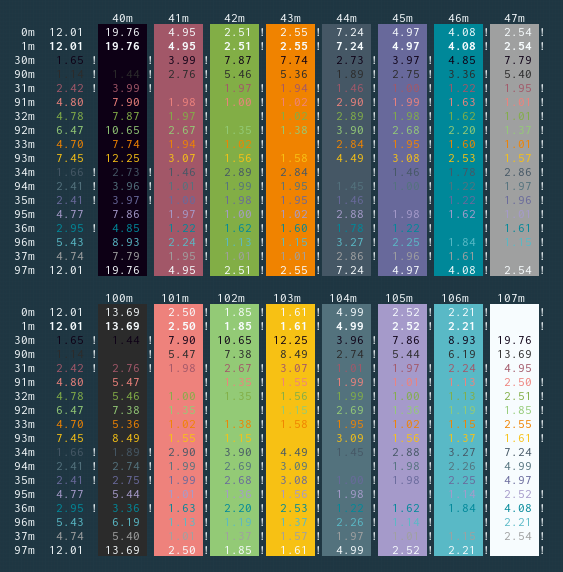
図 1 のような表示を行う Python スクリプトです。参考にしたシェルスクリプトが下記のリンク先にあります。
import subprocess
import re

LV_2A = 4.5    # 最低限のコントラスト >= LV_2A
LV_3A = 7.0    # より十分なコントラスト >= LV_3A

# SGR パラメータの表示用文字列
FG_STR = ('  0m', '  1m', \
          ' 30m', ' 90m', ' 31m', ' 91m', ' 32m', ' 92m', ' 33m', ' 93m', \
          ' 34m', ' 94m', ' 35m', ' 95m', ' 36m', ' 96m', ' 37m', ' 97m')
BG_STR = ('  40m  ', '  41m  ', '  42m  ', '  43m  ', '  44m  ', '  45m  ', '  46m  ', '  47m  ')
BB_STR = (' 100m  ', ' 101m  ', ' 102m  ', ' 103m  ', ' 104m  ', ' 105m  ', ' 106m  ', ' 107m  ')

# RGB 値をとる X リソースを選別するための正規表現
PAT_XRCOLOR = re.compile(r'\w+\.(\w+):\s*(#\w{6})')

# SGR パラメータから RGB 値を得るためのハッシュテーブル
RgbTab = {}

#
# メイン関数
#
def main():
    init()
    print('')
    colours(0); print('')
    colours(1); print('')

#
# 初期化
# urxvt の X リソースを読み出して RgbTab を完成させる
#
def init():
    query = f'xrdb -query | grep URxvt'
    proc = subprocess.Popen(query, shell = True,
                            stdin = subprocess.PIPE,
                            stdout = subprocess.PIPE,
                            stderr = subprocess.PIPE)
    sout, serr = proc.communicate()

    lines = sout.decode('utf-8').split('\n')
    for line in lines:
        m = PAT_XRCOLOR.match(line)
        if not m:
            continue

        name = m.group(1)
        rgb = m.group(2)

        if (name == 'foreground'):
            RgbTab['fg'] = rgb
            RgbTab['0m'] = rgb
            RgbTab['1m'] = rgb
        elif (name == 'background'):
            RgbTab['bg'] = rgb
        elif name[0:5] == 'color':
            colno = int(name.replace('color', ''))
            if (colno >= 0) and (colno <= 7):
                RgbTab[f'3{colno}m'] = rgb
                RgbTab[f'4{colno}m'] = rgb
            elif (colno >= 8) and (colno <= 15):
                colno -= 8
                RgbTab[f'9{colno}m'] = rgb
                RgbTab[f'10{colno}m'] = rgb
            else:
                continue
        else:
            continue

#
# カラースキームを表示する
#
def colours(bright = 0):
    bgstrs = BG_STR if bright == 0 else BB_STR

    header = "             "
    for b in bgstrs:
        header += f' {b}'
    print(header)

    bgrgb = RgbTab['bg']

    for fgs in FG_STR:
        f = fgs.strip()
        cr = contrast_ratio(RgbTab[f], bgrgb)
        crstr = make_crstring(cr)
        j = judge(cr, ('!', ' ', ' '))
        print(f' {fgs} \033[{f}{crstr}\033[0m{j}', end = '')

        for bgs in bgstrs:
            b = bgs.strip()
            cr = contrast_ratio(RgbTab[f], RgbTab[b])
            crstr = make_crstring(cr)
            j = judge(cr, ('!', ' ', ' '))
            print(f'\033[{f}\033[${b}{crstr}\033[0m{j}', end = '')
        print('')

#
# RGB で指定された 2 色のコントラスト比を返す
# https://waic.jp/docs/WCAG20/Overview.html
#
def contrast_ratio(rgb1, rgb2):
    rl = (relative_luminance(rgb1), relative_luminance(rgb2))
    rl1 = max(rl)
    rl2 = min(rl)
    return (rl1 + 0.05) / (rl2 + 0.05)

#
# RGB で指定された色の相対輝度を返す
#
def relative_luminance(rgb):
    rgb = rgb.replace('#', '')
    rgb = [int(rgb[0:2], 16), int(rgb[2:4], 16), int(rgb[4:6], 16)]

    for i in range(0, len(rgb)):
        c = rgb[i]
        c /= 255
        if c <= 0.03928:
            c /= 12.92
        else:
            c = ((c + 0.055) / 1.055) ** 2.4
        rgb[i] = c

    return (0.2126 * rgb[0]) + (0.7152 * rgb[1]) + (0.0722 * rgb[2])

#
# コントラスト比の出力文字列を作って返す
#
def make_crstring(cr):
    return f'{cr:6.2f} '

#
# コントラスト比を判定する
# ダメなら '!'、まあまあなら '?'、十分なら ' ' を返す
#
def judge(cr, retstr = ('!', '?', ' ')):
    if cr < LV_2A: return retstr[0]
    elif cr < LV_3A: return retstr[1]
    else: return retstr[2]

if __name__ == '__main__':
    main()
HSV 表示ツール
使うかもと思って作ってはみたものの、まったく使わずに終わった HSV 表示ツールです。xrdb -query コマンドで urxvt の色リソースの RGB 値を取得して HSV に変換し、表示します。色の勉強と Python の勉強には役立ったと思います。
No  Name          RGB    R/255   G/255   B/255      H        S       V
 0  Black       #0d0015  0.0510  0.0000  0.0824  277.1429  1.0000  0.0824
 8  B.Black     #2b2b2b  0.1686  0.1686  0.1686  359.0000  0.0000  0.1686
 1  Red         #a25768  0.6353  0.3412  0.4078  346.4000  0.4630  0.6353
 9  B.Red       #ee827c  0.9333  0.5098  0.4863    3.1579  0.4790  0.9333
 2  Green       #82ae46  0.5098  0.6824  0.2745   85.3846  0.5977  0.6824
10  B.Green     #93ca76  0.5765  0.7922  0.4627   99.2857  0.4158  0.7922
 3  Yellow      #f08300  0.9412  0.5137  0.0000   32.7500  1.0000  0.9412
11  B.Yellow    #f7c114  0.9686  0.7569  0.0784   45.7269  0.9190  0.9686
 4  Blue        #455765  0.2706  0.3412  0.3961  206.2500  0.3168  0.3961
12  B.Blue      #53727d  0.3255  0.4471  0.4902  195.7143  0.3360  0.4902
 5  Magenta     #68699b  0.4078  0.4118  0.6078  238.8235  0.3290  0.6078
13  B.Magenta   #a59aca  0.6471  0.6039  0.7922  253.7500  0.2376  0.7922
 6  Cyan        #008899  0.0000  0.5333  0.6000  186.6667  1.0000  0.6000
14  B.Cyan      #59b9c6  0.3490  0.7255  0.7765  187.1560  0.5505  0.7765
 7  White       #9fa0a0  0.6235  0.6275  0.6275  180.0000  0.0062  0.6275
15  B.White     #f7fcfe  0.9686  0.9882  0.9961  197.1429  0.0276  0.9961
--  foreground  #f7fcfe  0.9686  0.9882  0.9961  197.1429  0.0276  0.9961
--  background  #203744  0.1255  0.2157  0.2667  201.6667  0.5294  0.2667
import subprocess
import re

# RGB 値をとる X リソースを選別するための正規表現
PAT_XRCOLOR = re.compile(r'\w+\.(\w+):\s*(#\w{6})')

#
# メイン関数
#
def main():
    xr = readxr()
    printtable(xr)

#
# urxvt の色関係の X リソースを読み出してリストにして返す
#
def readxr():
    xr = [[None, None]] * 18    # [0..15]: color0..15, [16]: foreground, [17]: background

    query = f'xrdb -query | grep URxvt'
    proc = subprocess.Popen(query, shell = True,
                            stdin = subprocess.PIPE,
                            stdout = subprocess.PIPE,
                            stderr = subprocess.PIPE)
    sout, serr = proc.communicate()

    lines = sout.decode('utf-8').split('\n')
    for line in lines:
        m = PAT_XRCOLOR.match(line)
        if not m:
            continue

        name = m.group(1)
        if name == 'foreground':
            i = -2
        elif name == 'background':
            i = -1
        elif name[0:5] == 'color':
            i = int(name.replace('color', ''))
            if (i < 0) or (i > 15):
                continue
        else:
            continue
        rgb = m.group(2)
        xr[i] = [name, rgb]

    return xr

#
# urxvt の色リソース一覧を表示する
#
def printtable(xr):
    name = ('Black', 'Red', 'Green', 'Yellow', 'Blue', 'Magenta', 'Cyan', 'White', \
            'B.Black', 'B.Red', 'B.Green', 'B.Yellow', 'B.Blue', 'B.Magenta', 'B.Cyan', 'B.White')
    w = ('2', '10', '7', '6', '6', '6', '8', '6', '6')
    sp = '  '

    header = f'{"No":>{w[0]}}{sp}' + \
             f'{"Name":<{w[1]}}{sp}' + \
             f'{"RGB":^{w[2]}}{sp}' + \
             f'{"R/255":^{w[3]}}{sp}' + \
             f'{"G/255":^{w[4]}}{sp}' + \
             f'{"B/255":^{w[5]}}{sp}' + \
             f'{"H":^{w[6]}}{sp}' + \
             f'{"S":^{w[7]}}{sp}' + \
             f'{"V":^{w[8]}}{sp}'
    print('\n' + header)

    for i in range(0, len(xr)):
        x = xr[i]

        if (i >= 0) and (i <= 7):
            xbright = xr[i + 8]
            printline(i, name[i], x[1], srgb(x[1]), rgb2hsv(x[1], True), sp, '.4f', w)
            printline(i + 8, name[i + 8], xbright[1], srgb(xbright[1]), rgb2hsv(xbright[1], True), sp, '.4f', w)
        elif (i >= 8) and (i <= 15):
            pass
        else:
            printline('--', x[0], x[1], srgb(x[1]), rgb2hsv(x[1], True), sp, '.4f', w)

    print('')

#
# 1 行出力
#
def printline(i, name, rgb, srgb, hsv, sp = '  ', f = '.4f',
              w = ('2', '10', '7', '6', '6', '6', '8', '6', '6')):
        line = f'{i:>{w[0]}}{sp}' + \
               f'{name:<{w[1]}}{sp}' + \
               f'{rgb:<{w[2]}}{sp}' + \
               f'{srgb[0]:>{w[3]}{f}}{sp}' + \
               f'{srgb[1]:>{w[4]}{f}}{sp}' + \
               f'{srgb[2]:>{w[5]}{f}}{sp}' + \
               (f'{hsv[0]:>{w[6]}{f}}{sp}' if hsv[0] >= 0 else f'{"undef":>{w[6]}}{sp}') + \
               (f'{hsv[1]:>{w[7]}{f}}{sp}' if hsv[1] >= 0 else f'{"undef":>{w[7]}}{sp}') + \
               f'{hsv[2]:>{w[8]}{f}}'
        print(line)

#
# RGB → HSV 変換
# https://ja.wikipedia.org/wiki/HSV%E8%89%B2%E7%A9%BA%E9%96%93
#
def rgb2hsv(rgb, cyl = False):
    r, g, b = srgb(rgb)
    rgbmax = max([r, g, b])
    rgbmin = min([r, g, b])

    h = rgbmax - rgbmin

    s = h                          # 円錐モデル
    if cyl and (rgbmax != 0.0):    # 円柱モデル
        s /= rgbmax
    else:
        s = -1

    if h <= 0.0:
        h = -1
    elif rgbmin == b:
        h = (60 * ((g - r) / h)) + 60
    elif rgbmin == r:
        h = (60 * ((b - g) / h)) + 180
    else:  # rgbmin == g
        h = (60 * ((r - b) / h)) + 300

    if h:
        h %= 360
    v = rgbmax

    return [h, s, v]

#
# RGB 値 (#rrggbb) を 0.0..1.0 の範囲に正規化して返す
#
def srgb(rgb):
    rgb = rgb.replace('#', '')
    r = int(rgb[0:2], 16)
    g = int(rgb[2:4], 16)
    b = int(rgb[4:6], 16)
    return [r / 255, g / 255, b / 255]

if __name__ == '__main__':
    main()